Butterfinger Bliss Balls: A Sweet Nostalgic Treat
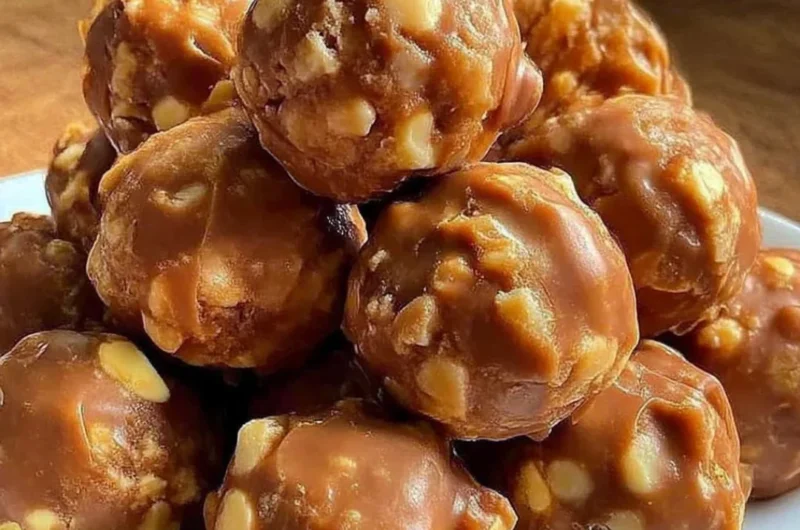
Ah, the sweet memory of childhood treat time! Growing up, the thrill of finding a Butterfinger bar in my lunchbox was immeasurable. The moment I bit into that crunchy, chocolatey, and creamy bar coated with peanut butter layers, the world felt a little lighter. Those little golden moments inspired me to create this delightful bite-sized treat: Butterfinger Bliss Balls. These irresistible no-bake delights are perfect for satisfying your sweet tooth during cozy evenings or as a fun treat for your family gatherings. Plus, they’re an easy weeknight dessert that everyone will adore!
This is one you’ll definitely want to pin for later!
Why You’ll Love This Recipe
- Quick & Easy: With just a few simple steps, you can whip up these tasty bites in no time!
- No-Bake Delight: No oven? No problem! This recipe requires no baking, making it perfect for warmer weather.
- Crowd-Pleasing Treat: Perfect for parties or holiday gatherings — everyone will be coming back for seconds!
- Family-Friendly Fun: Kids can join in the fun and help with rolling the balls and dipping them in chocolate.
- Customizable: Want to mix things up? These bliss balls can easily be tailored to your taste and preferences.
What You’ll Need
Gather these simple ingredients for your Butterfinger Bliss Balls:
- 1 cup creamy peanut butter
- 1 cup graham cracker crumbs
- 1 cup Butterfinger candy bars, crushed
- 2 cups melted chocolate (milk or dark)
Let’s Make It Together
Making Butterfinger Bliss Balls is an experience filled with joy, so roll up your sleeves and let’s get started!
- In a mixing bowl, combine the creamy peanut butter, graham cracker crumbs, and crushed Butterfinger candy bars. The sweet aroma will take you back to those joyful days!
- Mix until everything is well combined, creating a thick and slightly sticky mixture that promises creamy goodness.
- Roll the mixture into small balls, about 1 inch in diameter — you want them to be just the right size for popping in your mouth!
- Dip each ball into the melted chocolate, ensuring they are fully coated. If you have extra chocolate, don’t be shy — a little more never hurts!
- Place the chocolate-covered bliss balls on a baking sheet lined with parchment paper, where they will rest comfortably.
- Refrigerate until the chocolate is set, which takes about 30 minutes. This will give them that delightful crunch when you take a bite.
- Serve and enjoy the smiles that come with each blissful bite!
Delicious Variations to Try
Want to add your own twist to the Butterfinger Bliss Balls? Here are a few fun ideas:
- Crispy Caramel Bliss: Add a pinch of flaked sea salt and sprinkle crushed caramel candies for an indulgent twist.
- Nutty Delight: Mix in some chopped nuts like almonds or pecans for a crunchy texture.
- Zesty Orange Infusion: Add a splash of orange extract for a refreshing citrus twist that brightens the rich flavors!
- Dipped in White Chocolate: Change it up and dip in white chocolate for a sweeter, creamy variation that melts in your mouth.
Chef Emma’s Helpful Tips
To ensure your butterfinger creation turns out perfectly every time, keep these tips in mind:
- Make-Ahead Magic: These bliss balls can be made a few days in advance and stored in the refrigerator for quick treats when surprise guests arrive!
- Ingredient Swaps: No Butterfinger? No problem! Try swapping in other candy bars like Snickers or Milky Way for exciting flavor combinations.
- Storage Suggestions: Store leftovers in an airtight container in the fridge for up to one week, keeping the bliss alive!
Nutrition Information per Serving
- Serving Size: 1 bliss ball
- Calories: 150
- Carbs: 12g
- Sugar: 8g
- Fat: 9g
- Protein: 3g
- Sodium: 50mg
Frequently Asked Questions
Can I make this ahead?
Absolutely! You can prepare these bliss balls a few days in advance and refrigerate them until you’re ready to serve.
Can I use different ingredients?
Yes! Feel free to swap the Butterfinger for any of your favorite candy bars or adjust the nut butter to suit your taste.
How do I store leftovers?
Store any leftover bliss balls in an airtight container in the refrigerator to keep them fresh and yummy!
How long does it last?
These treats will stay delicious for up to one week in the fridge. But, trust me, they won’t last that long!
A Cozy Closing Note
Butterfinger Bliss Balls are more than just a treat; they’re a way to relive those nostalgic moments while creating new ones with loved ones. Whether for a cozy evening at home or a festive gathering, these bites are sure to bring smiles and warm hearts. Save this Butterfinger Bliss Balls recipe to your sweet treats board so it’s ready when you need a cozy dessert! Enjoy every delicate, scrumptious bite!

Butterfinger Bliss Balls
- Total Time: 45 minutes
- Yield: 12 servings 1x
- Diet: Vegetarian
Description
Delightful no-bake treats inspired by the childhood favorite Butterfinger bars, perfect for satisfying your sweet tooth or sharing with family and friends.
Ingredients
- 1 cup creamy peanut butter
- 1 cup graham cracker crumbs
- 1 cup Butterfinger candy bars, crushed
- 2 cups melted chocolate (milk or dark)
Instructions
- In a mixing bowl, combine the creamy peanut butter, graham cracker crumbs, and crushed Butterfinger candy bars.
- Mix until everything is well combined, creating a thick and slightly sticky mixture.
- Roll the mixture into small balls, about 1 inch in diameter.
- Dip each ball into the melted chocolate, ensuring they are fully coated.
- Place the chocolate-covered bliss balls on a baking sheet lined with parchment paper.
- Refrigerate until the chocolate is set, about 30 minutes.
- Serve and enjoy!
Notes
These bliss balls can be made a few days in advance and stored in the refrigerator for quick treats.
- Prep Time: 15 minutes
- Cook Time: 30 minutes
- Category: Dessert
- Method: No-Bake
- Cuisine: American
Nutrition
- Serving Size: 1 bliss ball
- Calories: 150
- Sugar: 8g
- Sodium: 50mg
- Fat: 9g
- Saturated Fat: 3g
- Unsaturated Fat: 6g
- Trans Fat: 0g
- Carbohydrates: 12g
- Fiber: 1g
- Protein: 3g
- Cholesterol: 0mg