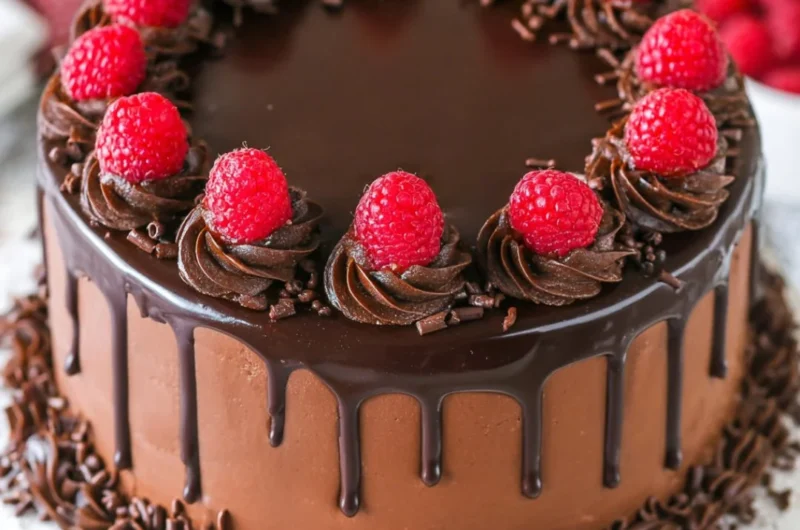
A Cozy Chocolate Raspberry Layer Cake Recipe
There’s something incredibly comforting about a rich, moist slice of chocolate cake layered with fresh raspberries. As the days grow shorter and the air turns crisp, I find myself longing for those moments in the kitchen that evoke sweet memories—stirring cake batter while the scent of chocolate envelops me like a warm hug. This Chocolate Raspberry Layer Cake isn’t just dessert; it’s an experience, a delightful combination of flavors that brings a smile to every face, making it a perfect centerpiece for any gathering. Ideal for cozy family get-togethers or celebrating life’s little victories, this cake is one you’ll definitely want to pin for later!
Why You’ll Love This Recipe
- Irresistibly Delicious: The rich chocolate cake combined with tart raspberry filling creates a flavor explosion that you’ll crave again and again.
- Crowd-Pleasing: Perfect for parties or family dinners, this cake will leave your guests talking about it long after the last slice is gone.
- Gorgeous Layers: With its stunning layers, this cake is as beautiful as it is delicious—a feast for the eyes as well as the palate.
- Simple Steps: Follow my easy-to-understand instructions and bring this dreamy cake to life even if you’re short on baking experience.
- Anytime Treat: Whether it’s a holiday gathering or a cozy weeknight dessert, this cake fits the occasion beautifully!
Ingredients You’ll Need for Chocolate Raspberry Layer Cake
- 1/4 cup (52g) granulated sugar
- 1 tbsp cornstarch
- 2 tsp water
- 2 cups (225g) raspberries*
- 1 3/4 cups (228g) all-purpose flour
- 2 cups (414g) granulated sugar
- 3/4 cup (85g) natural unsweetened cocoa powder
- 2 1/4 tsp baking soda
- 1/2 tsp baking powder
- 1 tsp salt
- 1 cup (240ml) milk
- 1/2 cup (120ml) vegetable oil
- 1 1/2 tsp vanilla extract
- 2 large eggs
- 1 cup (240ml) hot water
- 1 1/2 cups (336g) unsalted butter (room temperature)
- 12 oz (2 cups | 338g) semi-sweet chocolate chips (melted)
- 5 tbsp (35g) Hershey’s dark cocoa powder
- 6 cups (690g) powdered sugar
- 1/2 tsp salt
- 10-12 tbsp (150-180ml) heavy whipping cream
- 9 oz (1 1/2 cups | 254g) semi-sweet chocolate chips
- 3/4 cup heavy whipping cream
Step-by-Step Instructions
To Make the Raspberry Filling
- In a small saucepan, combine the granulated sugar, cornstarch, and water, stirring until smooth.
- Add the raspberries and cook over medium heat until the mixture thickens and bubbles, about 5-7 minutes. Remove from heat and let cool.
To Make the Cake Layers
- Preheat your oven to 350°F (175°C). Grease and flour two 9-inch round cake pans.
- In a mixing bowl, whisk together the flour, granulated sugar, cocoa powder, baking soda, baking powder, and salt.
- Add milk, vegetable oil, vanilla extract, and eggs to the dry ingredients. Beat with a mixer until well combined.
- Gradually add the hot water, mixing slowly until fully integrated. The batter will be thin—this is perfect!
- Divide the batter evenly between the prepared pans. Bake for 30-35 minutes, or until a toothpick inserted in the center comes out clean. Let the cakes cool in the pans for 10 minutes, then transfer them to a wire rack to cool completely.
To Make the Chocolate Frosting
- In a large bowl, beat the unsalted butter until creamy. Gradually add melted semi-sweet chocolate chips, mixing until smooth.
- Sift in the dark cocoa powder and powdered sugar, adding a pinch of salt. Gradually mix in the heavy cream until you reach your desired frosting consistency.
To Make the Ganache and Finish the Cake
- For the ganache, heat the 3/4 cup of heavy whipping cream in a small saucepan until just simmering. Pour it over 9 oz of semi-sweet chocolate chips in a heatproof bowl. Let sit for a few minutes, then stir until smooth and glossy.
- To assemble, place one cake layer on a serving plate. Spread half of the raspberry filling over the top, followed by a layer of chocolate frosting. Place the second cake layer on top and repeat the process.
- Pour the ganache over the assembled cake, letting it drip down the sides for a beautiful finish.
Fun Ways to Customize It
- Lemon Zest: Add a sprinkle of lemon zest to the raspberry filling for a refreshing twist.
- Nutty Crunch: Incorporate crushed hazelnuts or walnuts in between the layers for a satisfying crunch.
- Different Berries: Swap out the raspberries for strawberries or blueberries to create a different flavor profile.
- Flavored Cream: Try infusing the heavy cream in the ganache with mint or orange zest for an extra layer of flavor.
Chef Emma’s Helpful Tips
- Make Ahead: You can bake the cake layers a day in advance. Just wrap them tightly in plastic wrap and store them in the fridge until you’re ready to assemble.
- Ingredient Swaps: If you’re out of buttermilk, you can use regular milk and add a tablespoon of vinegar or lemon juice to replicate the acidity.
- Slicing: Use a serrated knife to slice the cake layers cleanly, and always chill them for about 30 minutes before cutting for best results.
- Storage: Store any leftovers in an airtight container in the fridge for up to 4 days.
What’s Inside – Nutrition Breakdown
- Serving size: 1 slice (1/12 of the cake)
- Calories: 540
- Carbohydrates: 78g
- Sugar: 45g
- Fat: 25g
- Protein: 5g
- Sodium: 200mg
Frequently Asked Questions
Can I make this ahead?
Yes! Cake layers can be baked up to a day ahead and stored in the fridge until you’re ready to assemble.
Can I use different ingredients?
Absolutely! You can easily swap out raspberries for other berries or adjust the flour for gluten-free options.
How do I store leftovers?
Keep the cake in an airtight container in the fridge for up to 4 days.
How long does it last?
The cake is best enjoyed within a few days, but can last up to a week if properly stored.
A Cozy Closing Note
This Chocolate Raspberry Layer Cake is not just a dessert; it’s a sweet reminder of the joys found in baking and sharing with loved ones. Its layers represent the moments that bring us together—rich, sweet, and a touch tangy, much like the memories we cherish. Save this recipe to your dessert board so it’s ready when you need a cozy treat! Happy baking!