
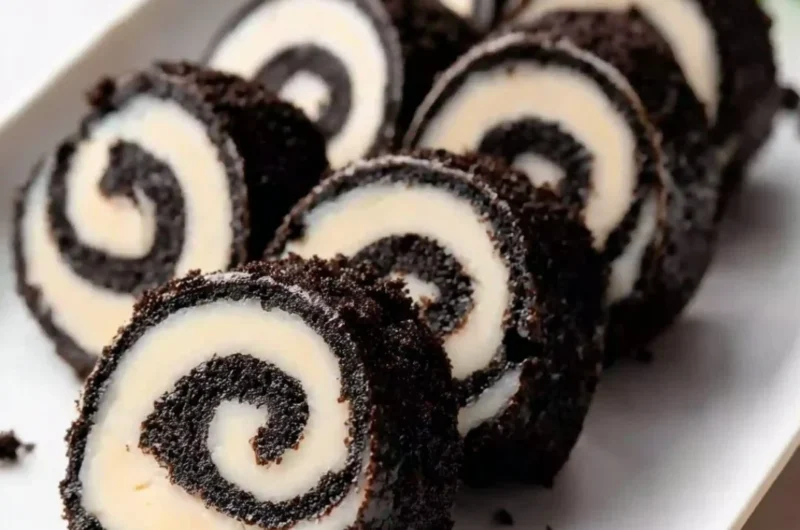
Oreo Sushi Rolls: A Cozy, No-Bake Treat for Everyone
Imagine this: a rainy afternoon, the scent of chocolate wafting through the air, and laughter echoing around the kitchen as you gather your favorite snacks. This is where our delicious journey begins with Oreo Sushi Rolls! It’s almost unbelievable how simple and delightful this recipe is, yet it brings so much joy and comfort. These whimsical little sushi-inspired confections transform classic Oreo cookies into a fun, crowd-pleasing treat that is perfect for any occasion, whether you’re hosting a cozy gathering or simply indulging in a sweet afternoon snack. Trust me, these Oreo Sushi Rolls are a creamy fall dessert that will certainly leave everyone craving more. This is one you’ll definitely want to pin for later!
Why You’ll Love This Recipe
- Quick and easy to make, perfect for busy weeknights or last-minute guests.
- No baking required—simply roll, chill, and slice!
- Family-friendly and a hit with all ages; kids and adults alike will smile at the sight of these delightful rolls.
- Customizable with your favorite fillings and toppings to match any taste.
- A fun way to get creative in the kitchen—let your imagination soar!
Gather These Simple Ingredients
To whip up these delightful Oreo Sushi Rolls, you’ll need just a few ingredients that come together to create a sweet sensation. Here’s what to gather:
- Oreo cookies (approx. 20)
- Sweet filling of your choice (like Nutella, cream cheese, or even a fruity jam)
- Optional toppings (sprinkles, crushed nuts, or a drizzle of chocolate sauce)
How to Make Oreo Sushi Rolls
Let’s roll up our sleeves and transform those Oreos into a delightful treat! Follow these simple steps to create your very own Oreo Sushi Rolls:
- Crush the Oreo cookies into fine crumbs. Place them in a zip-top bag and use a rolling pin or a food processor for the finest results.
- Mix the crushed cookies with a little filling of your choice to form a dough. Start with about 1/4 cup of filling and adjust for the right texture.
- Roll out the dough on a sheet of parchment paper. Use a rolling pin to create a rectangle about 1/4 inch thick.
- Spread your chosen filling evenly over the rolled-out dough. Use a spatula for a smooth, even layer. Feel free to sprinkle on some fruits or nuts if you’d like!
- Roll the dough up tightly using the parchment paper. Start from one edge and roll it up like a burrito. Chill in the refrigerator for about 30 minutes to help it firm up.
- Once chilled, slice into bite-sized pieces that resemble sushi rolls. A sharp knife will give you the best results, keeping those edges clean and appealing.
- Serve with optional toppings or sauces if desired. A drizzle of chocolate or a sprinkle of colorful sprinkles adds a lovely touch!
Fun Ways to Customize It
These Oreo Sushi Rolls offer a world of creativity to explore! Here are a few fun variations you could try:
- Fruity Delight: Instead of Nutella, spread a layer of fruit jam and then add fresh fruit slices like strawberries or bananas for a fresh twist.
- Nutty Indulgence: Mix crushed nuts into your filling for an extra crunch—how about almond butter with a sprinkle of chopped almonds on top?
- Chocolate Lovers: Go all-in with chocolate—sub out your filling for chocolate hazelnut spread and add a drizzle of melted chocolate sauce on top.
- Festive Sprinkles: Embrace the season! Use themed sprinkles for holidays to make your rolls even more fun and colorful.
Chef Emma’s Helpful Tips
To ensure your Oreo Sushi Rolls are the best they can be, keep these handy tips in mind:
- Make Ahead: These rolls can be made a day in advance! Just store them in an airtight container in the fridge.
- Ingredient Swaps: If you’re feeling adventurous, try different flavored Oreos or fillings to create new combinations.
- Slicing Tips: Warm the knife under hot water before slicing the chilled rolls to get cleaner cuts.
- Storage Suggestions: If you have leftovers, store them in an airtight container in the refrigerator for up to three days.
Nutrition Information per Serving
Here’s a breakdown of what’s inside each serving of Oreo Sushi Rolls (based on approx. 10 servings):
- Serving Size: 1 piece
- Calories: 100
- Carbs: 15g
- Sugar: 7g
- Fat: 4g
- Protein: 1g
- Sodium: 50mg
Frequently Asked Questions
Here are some common questions I’ve received about these delightful Oreo Sushi Rolls:
Can I make this ahead?
Absolutely! You can prepare these rolls a day in advance and store them in the fridge.
Can I use different ingredients?
Yes! Feel free to experiment with different flavors and fillings according to your taste.
How do I store leftovers?
Store the sliced rolls in an airtight container in the refrigerator for up to three days.
How long does it last?
These treats are best enjoyed fresh, but they can last in the fridge for about three days.
A Cozy Closing Note
Oreo Sushi Rolls are not just another dessert; they carry warmth, joy, and the magic of creativity. Whether serving them at a gathering or enjoying them on a cozy evening at home, these rolls are sure to bring smiles and stories to your table. Save this Oreo Sushi Rolls recipe to your desserts board so it’s ready when you need a cozy treat! Happy rolling!