Pizza Sliders: A Cozy Family Favorite
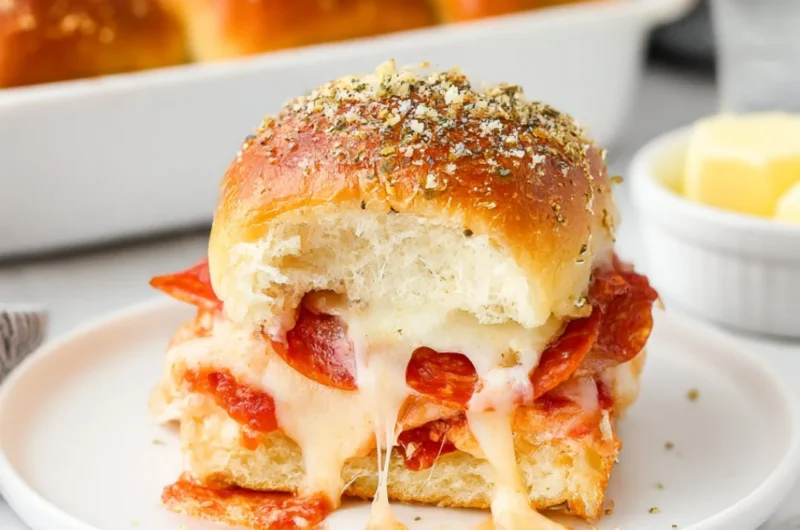
There’s something magical about a Saturday evening filled with the aroma of melted cheese and the sound of laughter echoing through the house. It reminds me of my childhood, huddled around the kitchen table with my family, devouring our favorite pizza sliders as we shared stories and made memories. These delightful little sliders are not just a meal; they’re an invitation to gather, to connect, and to truly enjoy each other’s company. Perfect for an easy weeknight dinner or a festive family gathering, this recipe for Pizza Sliders is one you’ll definitely want to pin for later!
Why You’ll Love This Recipe
- Quick to Prepare: With just a few simple steps, you can whip up these scrumptious sliders in no time—perfect for busy weekdays!
- Family-Friendly Fun: These mini pizzas are a hit with both kids and adults. They’re customizable, making mealtime a joyous experience for everyone.
- Perfect for Entertaining: Whether for a cozy movie night or a get-together with friends, these sliders will be a crowd-pleaser and spark delightful conversations.
- Versatile Ingredients: You can easily mix and match ingredients, allowing for zesty twists and surprises with every batch.
- Cheesy Comfort: There’s nothing quite like the gooey warmth of melted mozzarella cheese paired with savory toppings to warm your heart and soul.
What You’ll Need
Gather These Simple Ingredients:
- 12 Hawaiian rolls
- 1 cup pizza sauce
- 2 cups mozzarella cheese, shredded
- 1 cup pepperoni slices
- 1 bell pepper, diced (optional)
- 2 tablespoons olive oil
- 1 teaspoon Italian seasoning
Let’s Make It Together
- Preheat your oven to 350°F (175°C).
- Cut the Hawaiian rolls in half and place the bottom halves in a baking dish.
- Spread pizza sauce generously over the rolls, letting it soak into the fluffy bread.
- Layer on the mozzarella cheese, followed by the pepperoni and any additional toppings, such as the diced bell pepper for a crisp bite.
- Place the top halves of the rolls on the gooey fillings, almost like a delightful sandwich.
- Brush the tops with olive oil, giving them a glistening finish, and sprinkle Italian seasoning for that authentic pizza flavor.
- Bake for 10-12 minutes or until the cheese is melty and golden brown, filling your kitchen with a heavenly aroma.
- Slice into individual sliders and serve warm, watching your family’s eyes light up with delight!
Fun Ways to Customize It
- Veggie Lovers Delight: Replace the pepperoni with sautéed mushrooms, spinach, and bell peppers for a rich, earthy flavor that’s a feast for the senses.
- Hawaiian Twist: Add diced pineapples and swap the pepperoni for ham. This sweet and savory combo will transport you to a tropical paradise!
- Spicy Kick: Include sliced jalapeños and spicy sausage for a zesty version that brings the heat without losing that comforting essence.
- Margherita Inspired: Go classic with slices of fresh mozzarella, tomatoes, and basil for a fresh take that captures the essence of Italian cuisine.
Chef Emma’s Helpful Tips
- Make-Ahead Magic: Prepare the sliders in advance and cover them in the refrigerator. Bake just before serving for a warm, freshly made treat.
- Store with Ease: Leftover sliders can be stored in an airtight container in the fridge for up to 3 days. Simply reheat in the oven for the best results—nobody loves soggy sandwiches!
- Ingredient Swaps: Feel free to substitute the cheese for a dairy-free version or the rolls for whole grain varieties. Make it suit your dietary preferences!
- Cutting Trick: For easier slicing, use a serrated knife and cut the sliders while they are still warm to keep the gooey cheese intact.
Nutrition Information per Serving
- Serving Size: 1 slider
- Calories: 250
- Carbohydrates: 30g
- Sugar: 2g
- Fat: 12g
- Protein: 10g
- Sodium: 450mg
Frequently Asked Questions
Can I make this ahead?
Absolutely! You can assemble the sliders up to 24 hours in advance, just cover and refrigerate until you’re ready to bake.
Can I use different ingredients?
Yes! Get creative with your favorite toppings. These sliders are incredibly versatile.
How do I store leftovers?
Store any leftover sliders in an airtight container in the fridge for up to 3 days. Reheat them in the oven for the best taste.
How long does it last?
If stored correctly, leftover pizza sliders can last for about 3 days in the refrigerator.
A Cozy Closing Note
Pizza Sliders: A Cozy Family Favorite is more than just a recipe—it’s a way to bring warmth and joy into your family gatherings. Each slider is a bite-sized celebration steeped in nostalgia and love. I hope you enjoy making these as much as I do! Save this Pizza Sliders recipe to your favorite Pinterest board so it’s ready when you need a cozy treat!

Pizza Sliders
- Total Time: 27 minutes
- Yield: 12 servings 1x
- Diet: Vegetarian
Description
Delightful mini pizzas perfect for family gatherings or easy weeknight dinners, filled with gooey cheese and savory toppings.
Ingredients
- 12 Hawaiian rolls
- 1 cup pizza sauce
- 2 cups mozzarella cheese, shredded
- 1 cup pepperoni slices
- 1 bell pepper, diced (optional)
- 2 tablespoons olive oil
- 1 teaspoon Italian seasoning
Instructions
- Preheat your oven to 350°F (175°C).
- Cut the Hawaiian rolls in half and place the bottom halves in a baking dish.
- Spread pizza sauce generously over the rolls.
- Layer on the mozzarella cheese, followed by the pepperoni and diced bell pepper if using.
- Place the top halves of the rolls on the fillings.
- Brush the tops with olive oil and sprinkle with Italian seasoning.
- Bake for 10-12 minutes or until the cheese is melted and golden brown.
- Slice into individual sliders and serve warm.
Notes
Feel free to customize with your favorite toppings or to accommodate dietary preferences. Store leftovers in an airtight container for up to 3 days.
- Prep Time: 15 minutes
- Cook Time: 12 minutes
- Category: Appetizer
- Method: Baking
- Cuisine: American
Nutrition
- Serving Size: 1 slider
- Calories: 250
- Sugar: 2g
- Sodium: 450mg
- Fat: 12g
- Saturated Fat: 5g
- Unsaturated Fat: 7g
- Trans Fat: 0g
- Carbohydrates: 30g
- Fiber: 1g
- Protein: 10g
- Cholesterol: 20mg